Get Certified · Hands-on practice
Capstone practice: set up a complete client account
Practice the whole job, start to finish: one fictional client, eight phases, about 3 hours. It's the kind of end-to-end setup hands-on GoHighLevel work — and certification training — expects you to be comfortable with.
The client brief
New client message · Kalma Physio Studio (fictional)
"Hi! I'm Rina — I run a small physio studio. People message us about free assessments, but we lose half of them. Can you set up GHL so they can inquire, book a 45-minute assessment straight away, get reminded properly, and so I know immediately when someone replies?"
Work through the phases in order — each one builds on the one before. Use your own practice account or trial, and your own spare email addresses for testing. If you build it in YGHLB Practice, put your name and student ID on every name (for example Maria-Practice Assessments-024), and use a new form and calendar for it, so it doesn't start your lesson workflows. Every checklist saves in this browser, so you can spread it over a few days.
Not in Hazel's shared practice sub-account. There you're a user, and the first phases (creating a sub-account, adding users, the sending domain) need agency or admin access. Read those phases, and do the hands-on builds in the lessons instead.
Phase 1 of 8 · about 15 min
Create the client account and add the owner
Goal: A sub-account for Kalma Physio Studio exists, and the owner can log in to it.
Every client build starts with the right account and the right people in it. Building in the wrong account, or giving someone the wrong access, is the most common first-day mistake.
Steps
- Create a new sub-account for "Kalma Physio Studio — practice". Fill in a business name, phone, address and the time zone the studio works in.
- Switch into the new sub-account and confirm the name in the account switcher matches.
- Add the owner, Rina, as a user with full admin access to this sub-account only. Use your own spare email for her login while practicing.
- Fill in her availability on her user profile: Monday to Saturday, 10 am – 7 pm.
Reference · what yours should contain
Check it
Need a refresher? Agency vs Sub-Account · Navigating a Sub-Account
Phase 2 of 8 · about 25 min
Set up a dedicated email sending domain
Goal: The studio sends email from its own branded subdomain, not a shared default.
Emails sent from the business's own verified subdomain are more likely to reach the inbox, and they look like they come from the business. It also keeps one client's sending reputation separate from everyone else's.
Steps
- In the sub-account's email settings, add a dedicated sending domain — a subdomain such as mail.yourpracticedomain.com on a domain you control.
- GHL shows you a set of DNS records to add (typically TXT, CNAME and MX records, plus a DMARC record). Copy each one exactly.
- Add the records at your domain's DNS provider. If you use Cloudflare, turn the proxy OFF (gray cloud) for these records — proxied records won't verify.
- Back in GHL, click verify. DNS changes can take a while to spread, and certificates can take longer — that's normal. Note it and come back later rather than getting stuck.
Reference · what yours should contain
Check it
Need a refresher? Email vs SMS: Choosing Correctly
Phase 3 of 8 · about 10 min
Connect the owner's calendar and meeting link
Goal: Bookings land in Rina's own calendar, each with its own video meeting link.
If GHL can't see the owner's real calendar, it offers times she's already busy. And a fresh meeting link per appointment is more professional — and safer — than one link everyone shares.
Steps
- Log in as (or switch to) Rina's user profile and connect a Google calendar from her profile's calendar settings.
- Choose which calendar GHL should check for conflicts and which one it should add new bookings to. Refresh the page after saving, and check the choice stuck.
- Set Google Meet as her default meeting location, so each appointment gets its own generated link rather than a fixed one.
Reference · what yours should contain
Check it
Need a refresher? Calendar Types and When to Use Each
Phase 4 of 8 · about 20 min
Build the booking calendar
Goal: A "Free Assessment" calendar that books Rina automatically, with sensible limits.
Calendar settings decide whether the studio gets sensible bookings or chaos. Every number below answers a real business question — when can people book, how long, how far ahead, and how many.
Steps
- Create a calendar called "Free Assessment" and add Rina as its team member.
- Availability: Monday to Saturday, 10 am – 7 pm.
- Session length 45 minutes, with slots starting every 30 minutes.
- Minimum notice 12 hours; people can book up to 3 weeks ahead.
- One booking per slot, and a maximum of 5 bookings per day.
- Assign bookings to Rina, and turn on the option to skip assigning when the lead already has an assigned user — so returning clients keep their existing contact person.
- Turn on the consent checkbox and sticky contact on the booking form, and auto-confirm appointments.
- Turn OFF the calendar's own confirmation and reminder notifications. In this build, all messages come from workflows (Phase 8), so nobody gets duplicates.
- Save and make sure the calendar is active.
Reference · what yours should contain
Check it
Need a refresher? Calendar Types · Build a 24-Hour Appointment Reminder
Phase 5 of 8 · about 30 min
Build the form, funnel and chat widget
Goal: A two-page funnel: an inquiry form that leads straight to the booking calendar.
This is the front door. A lead fills in their details, then immediately sees where to book — the moment they're most interested.
Steps
- Build an inquiry form with first name, email and phone, all required. Remove any default agency branding and turn on sticky contact.
- Connect a domain or subdomain you control to the sub-account, for the funnel to live on.
- Create a funnel with two steps: a home page with the form, and a booking page with the "Free Assessment" calendar embedded.
- Set the form to redirect to the booking page after submission.
- Set up the chat widget and add it to ONE of the two pages (not both).
- Publish, open the live booking page, and copy its URL — you need it in Phase 6.
Reference · what yours should contain
Check it
Need a refresher? Forms and Field Mapping · Build a One-Page Lead Capture Funnel
Phase 6 of 8 · about 5 min
Store the booking link in a custom value
Goal: The booking page URL lives in one custom value that every email can use.
If the booking link is typed into five emails and the page ever moves, you have five things to fix — and you'll miss one. A custom value means one edit updates everything.
Steps
- Create (or update) a custom value called "Booking Page URL" and paste the live booking page URL from Phase 5.
- Create a second custom value, "Calendar Name", set to "Free Assessment".
- Note how to insert custom values into an email from the merge-field picker — you'll use it in Phase 8.
Reference · what yours should contain
Check it
Need a refresher? Custom Fields: Structuring Client Data
Phase 7 of 8 · about 5 min
Create the pipeline
Goal: A pipeline the workflows can move each lead through.
The workflows in the next phase move deals between these stages automatically, so the stages need to exist first.
Steps
- Create a pipeline called "Assessments" with four stages, in order: New Inquiry, Engaged, Assessment Booked, Missed Assessment.
Reference · what yours should contain
Check it
Need a refresher? Contacts vs Opportunities · Designing a Pipeline
Phase 8 of 8 · about 60 min
Build the four workflows
Goal: Leads are followed up, replies alert Rina, bookings are confirmed, and no-shows are tracked — automatically.
This is where the account starts working on its own. Each workflow does one job, and together they move every lead through the pipeline.
Steps
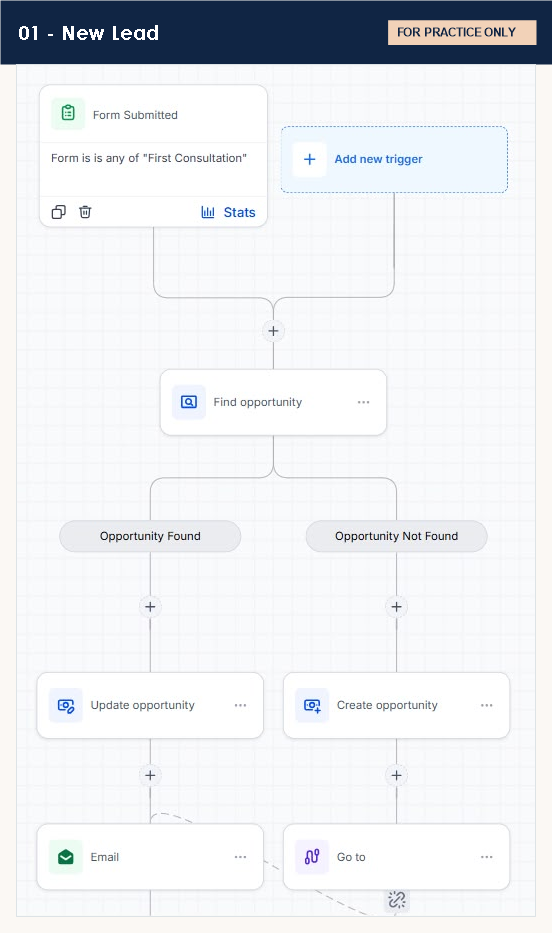
- Workflow A — "Inquiry follow-up": trigger on the inquiry form. Create an opportunity in "New Inquiry". Send a first email that includes the booking link (insert the Booking Page URL custom value). Add a couple of gentle follow-ups with waits in between. Allow contacts to enter again if they submit again.
- Make Workflow A stop as soon as the lead replies — use the workflow's goal/exit option for a reply, so nobody is chased after answering.
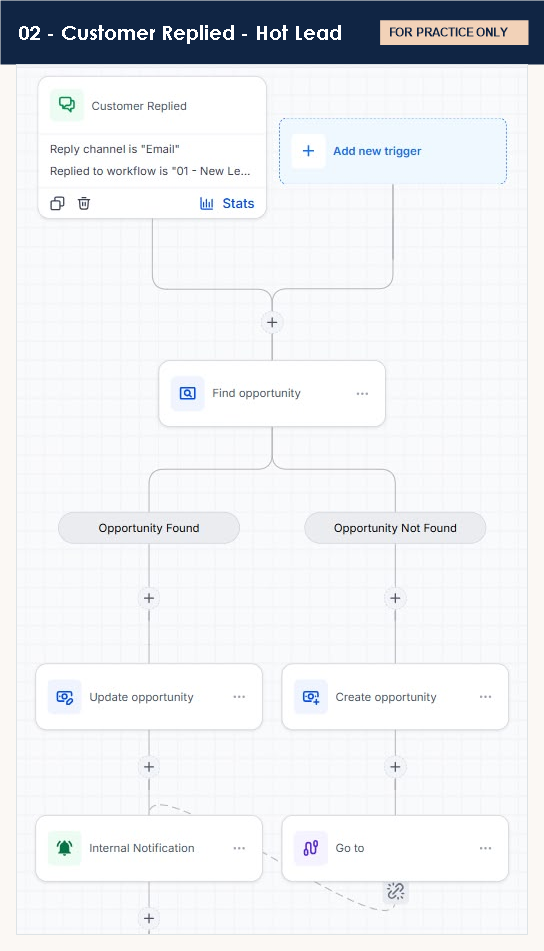
- Workflow B — "Lead replied": trigger when a contact replies to Workflow A. Move their opportunity to "Engaged" and send Rina an internal notification that includes the text of the lead's reply.
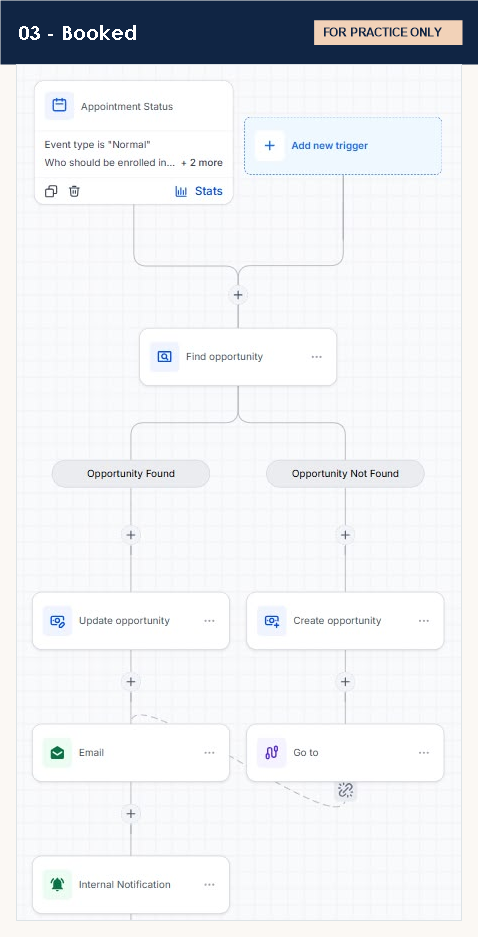
- Workflow C — "Assessment booked": trigger when an appointment is booked on Free Assessment. Move the opportunity to "Assessment Booked". Send a confirmation email that shows Rina's name, the appointment date and time, the meeting link, and links to cancel or reschedule. Send Rina a mobile app notification with the date and time that opens the opportunity when tapped.
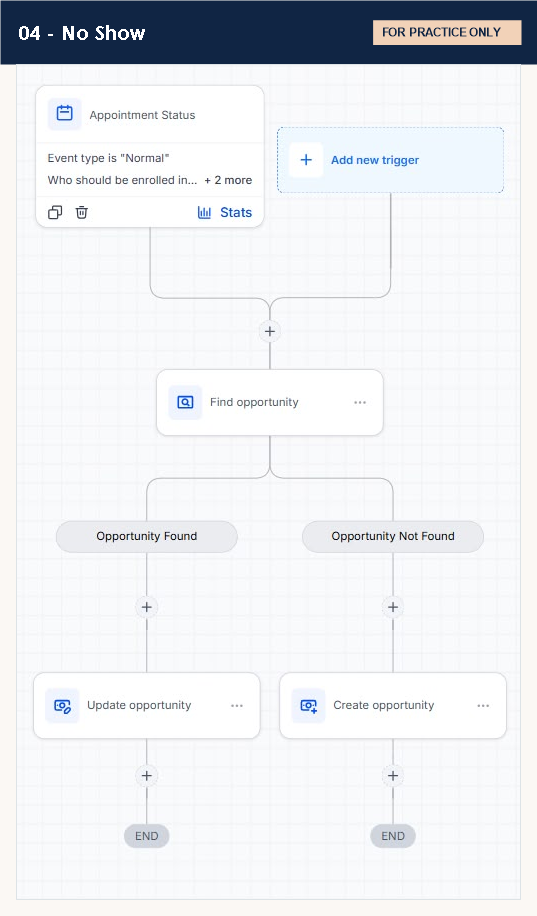
- Workflow D — "Missed assessment": trigger when an appointment's status changes to no-show. Move the opportunity to "Missed Assessment", and allow re-entry. (Stretch: add a friendly rebooking email.)
- Name every workflow clearly, save, and publish all four.
Reference · Hazel's real versions of these workflows
Check it
Need a refresher? Workflow practice: the find-then-update-or-create pattern · Workflow Triggers · Wait Steps · Testing a Workflow
The final test run
Run one test lead through the whole thing, as a real person would:
- Fill in the inquiry form on the live funnel.
- Check the deal appears in "New Inquiry" and the first email arrives with a working booking link.
- Reply to that email — the follow-ups stop, the deal moves to "Engaged", and Rina's notification shows your reply.
- Book an assessment — the deal moves to "Assessment Booked", the confirmation arrives with the meeting link, and the mobile notification fires.
- Mark the appointment as a no-show — the deal moves to "Missed Assessment".
If all five work, you've built a complete client system. Write it up as a practice project for your portfolio — never as client work.

Free feedback from Hazel
Get your build checked
Finished (or stuck)? Record a quick video of your work and post it in GHL Baddie HQ. Hazel watches it and leaves you a comment on what's working and what to fix.
- Record a 3–5 minute walkthrough with Loom. Loom is free. Show what you built, run one test while recording, and say anything you're unsure about.
- Copy your Loom share link.
- Post it in the GHL Baddie HQ Discord with three things: that it's the Capstone practice, which part you'd like checked, and one question you have.
- Hazel reviews it and comments. Others in the community may chip in too — that's half the fun.
⚠ Use a practice account only. Never record real client data, passwords or API keys.
Preparing for your certification?
I'll help you get ready — for free
Studying for the HighLevel certification on your own can feel like a lot. I've been through it, and I'm happy to help you prepare. No cost, no catch.
- Answers to your questions while you study
- Feedback on your practice builds
- A simple study plan that fits your schedule
How to get coaching
- Join GHL Baddie HQ, our free Discord community.
- Post that you're preparing for your certification and what you'd like help with.
- I'll reply there.
Haven't enrolled yet? When you're ready, you can sign up on HighLevel's certification page. (That's my affiliate link. It costs you nothing extra, and my coaching is free either way.)
Coaching covers the skills, never exam questions or answers. No one can guarantee a pass. Your GHL Baddie isn't affiliated with HighLevel, and HighLevel sets its own prices and terms.