Module 3 · Lesson 1 of 2
Forms and Field Mapping Forms at Field Mapping
Awaiting hands-on verification. The concepts here are sound, but the click-by-click steps have not yet been re-walked in a live GoHighLevel sub-account. GoHighLevel changes often, so a menu name or screen may differ from what you see. Flagged rather than presented as verified.
Before this: Custom Fields: Structuring Client Data
Your knowledge-check score on Smart Lists: Finding the Right Contacts was under 60%. Worth a quick re-read before this one — it builds on it.
On this page

In this lesson
Forms and Field Mapping
Sa lesson na ’to
Forms at Field Mapping

Read the transcript
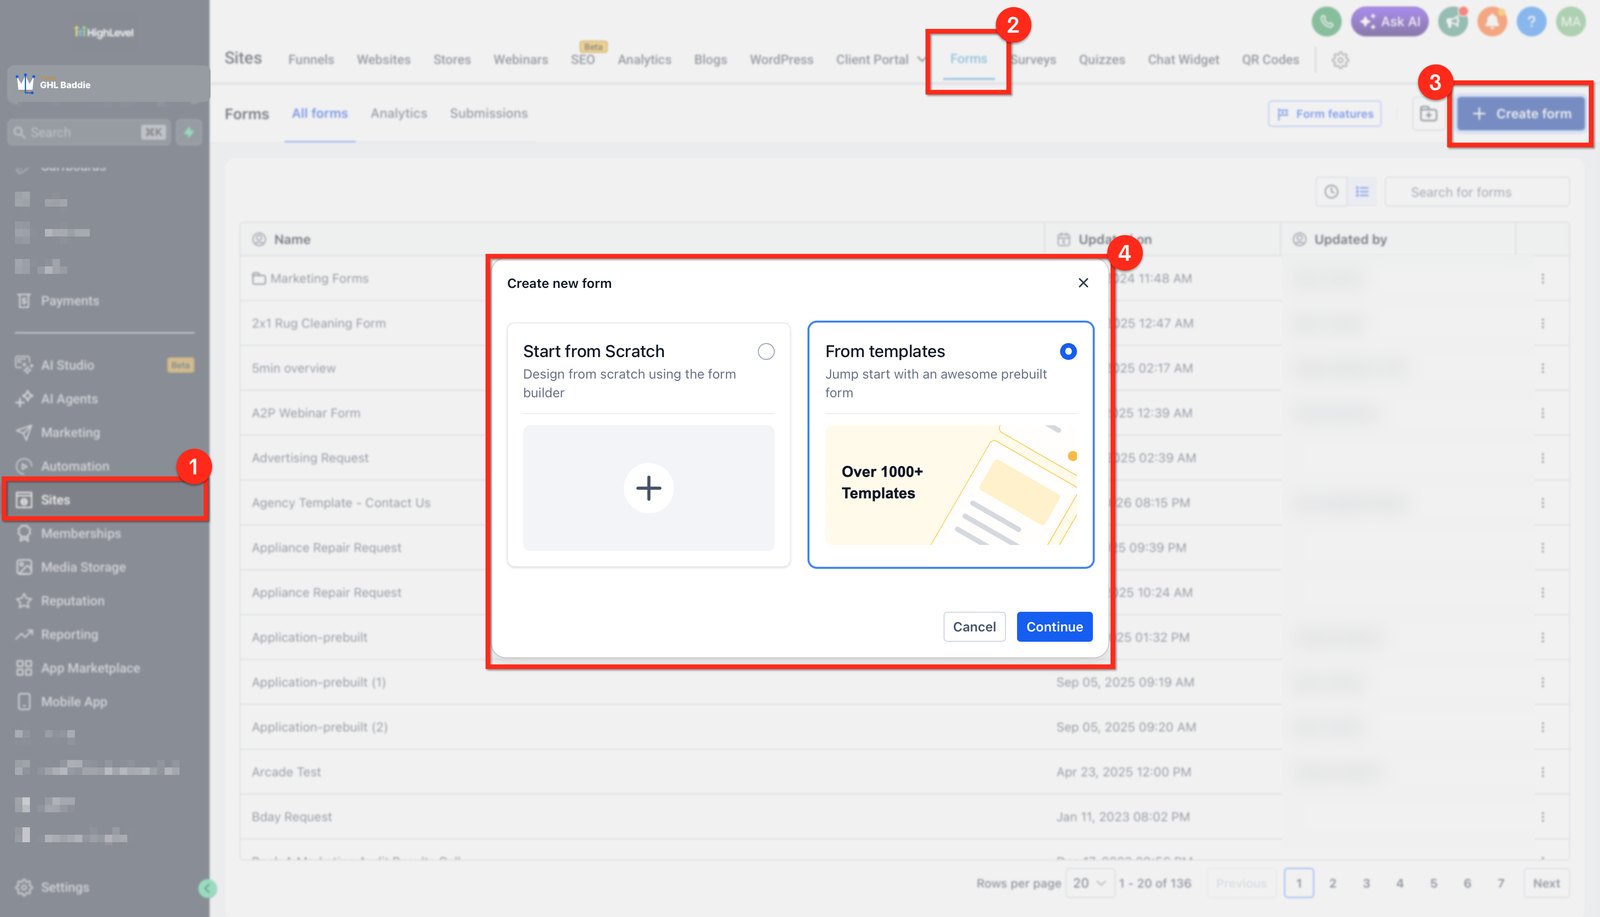
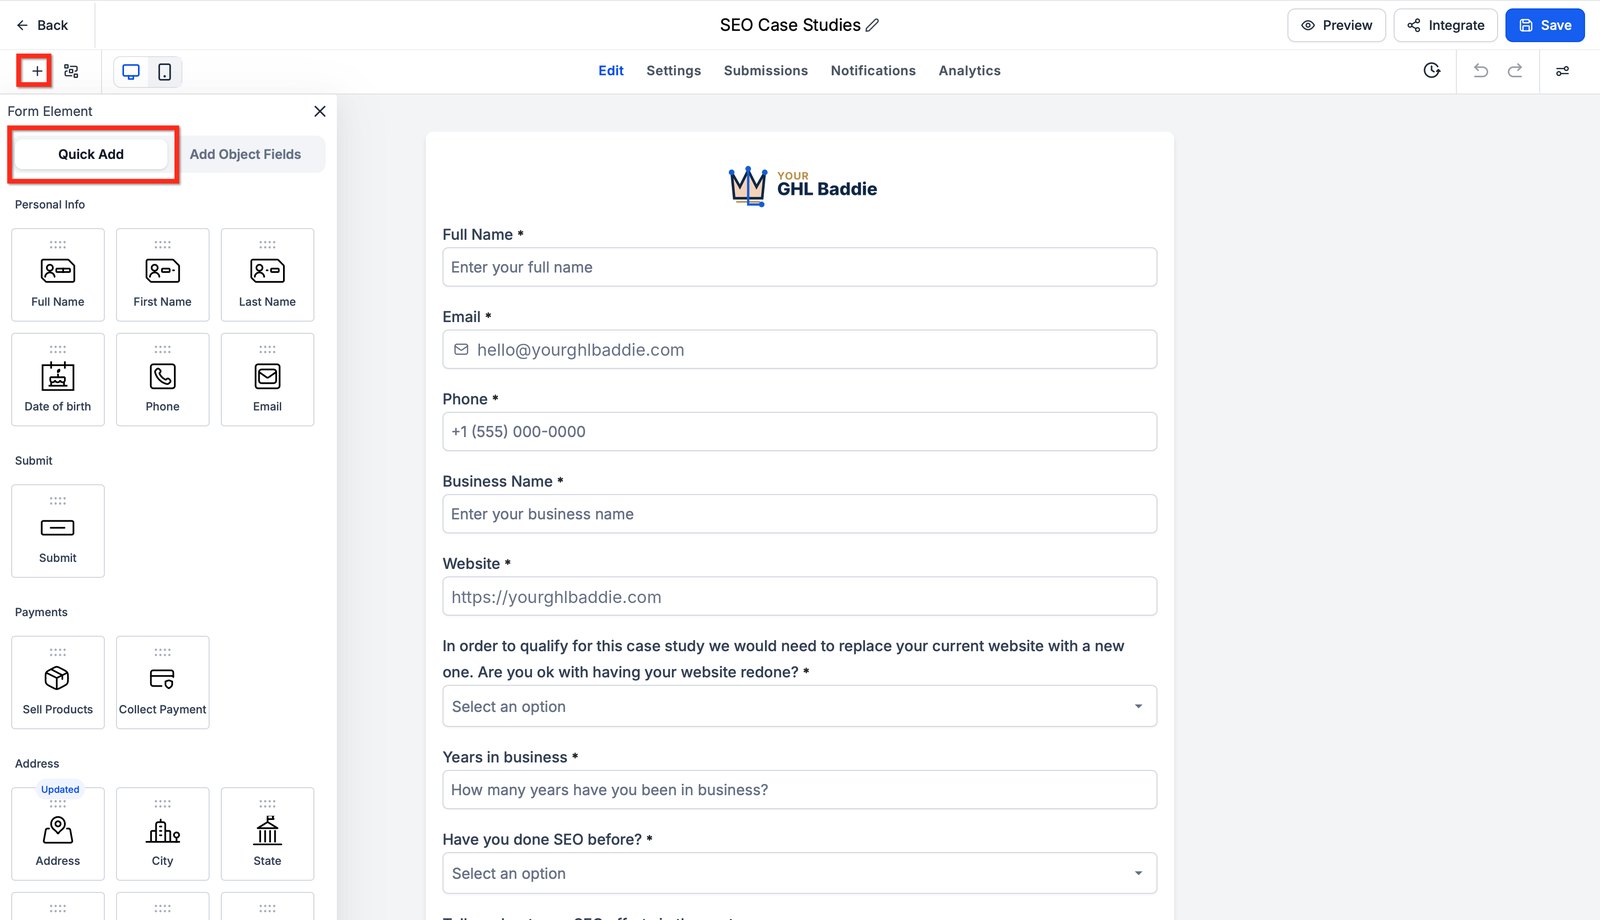
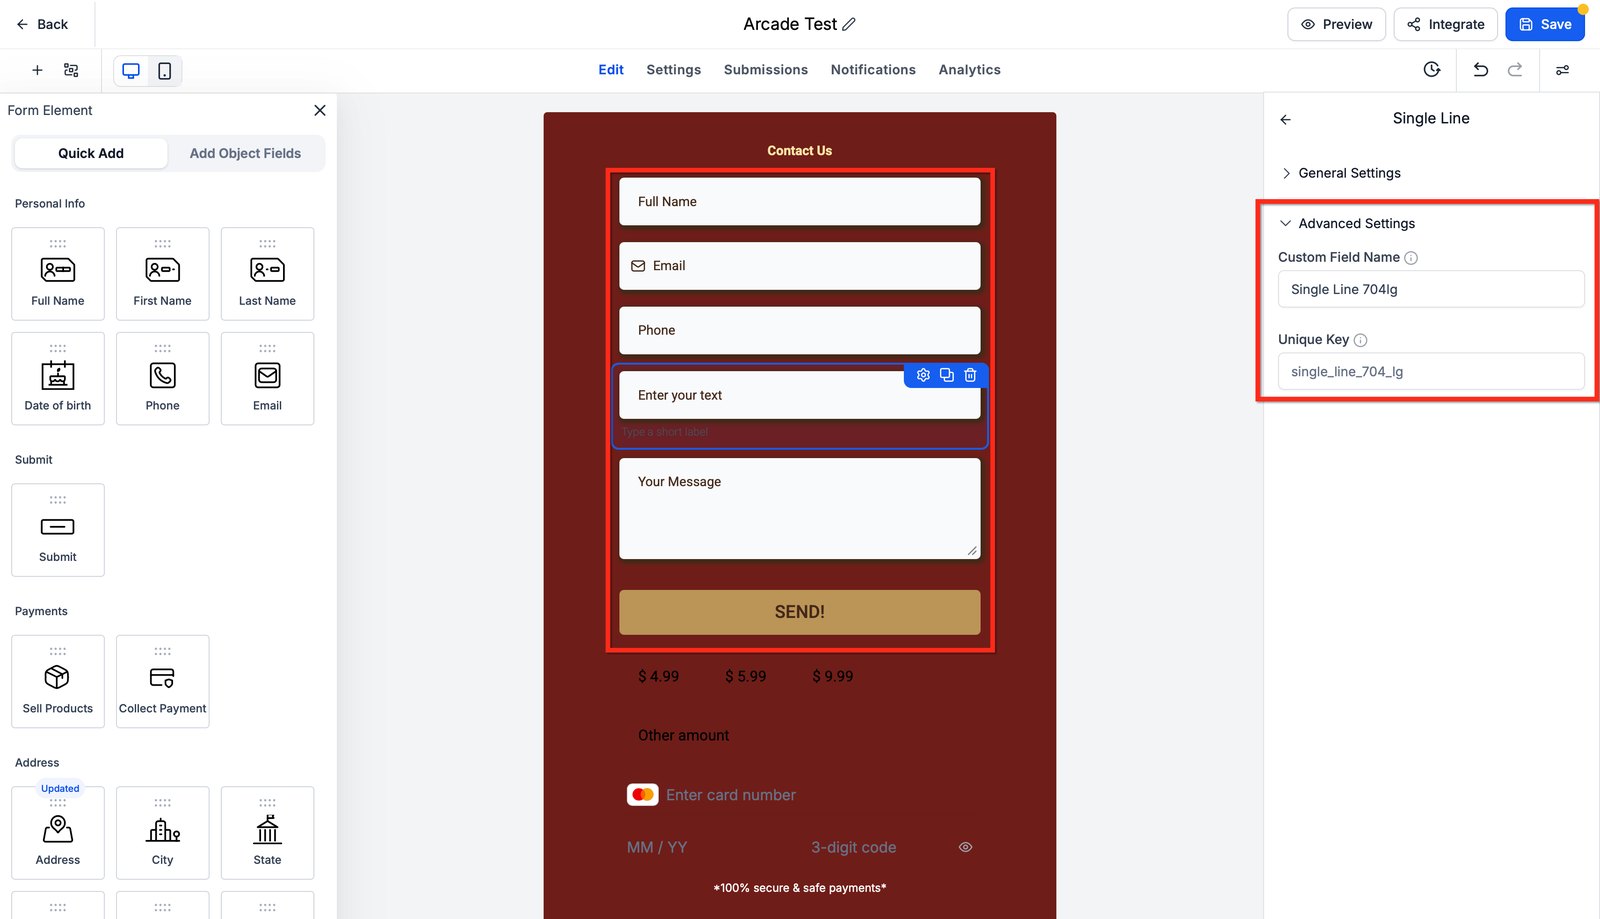
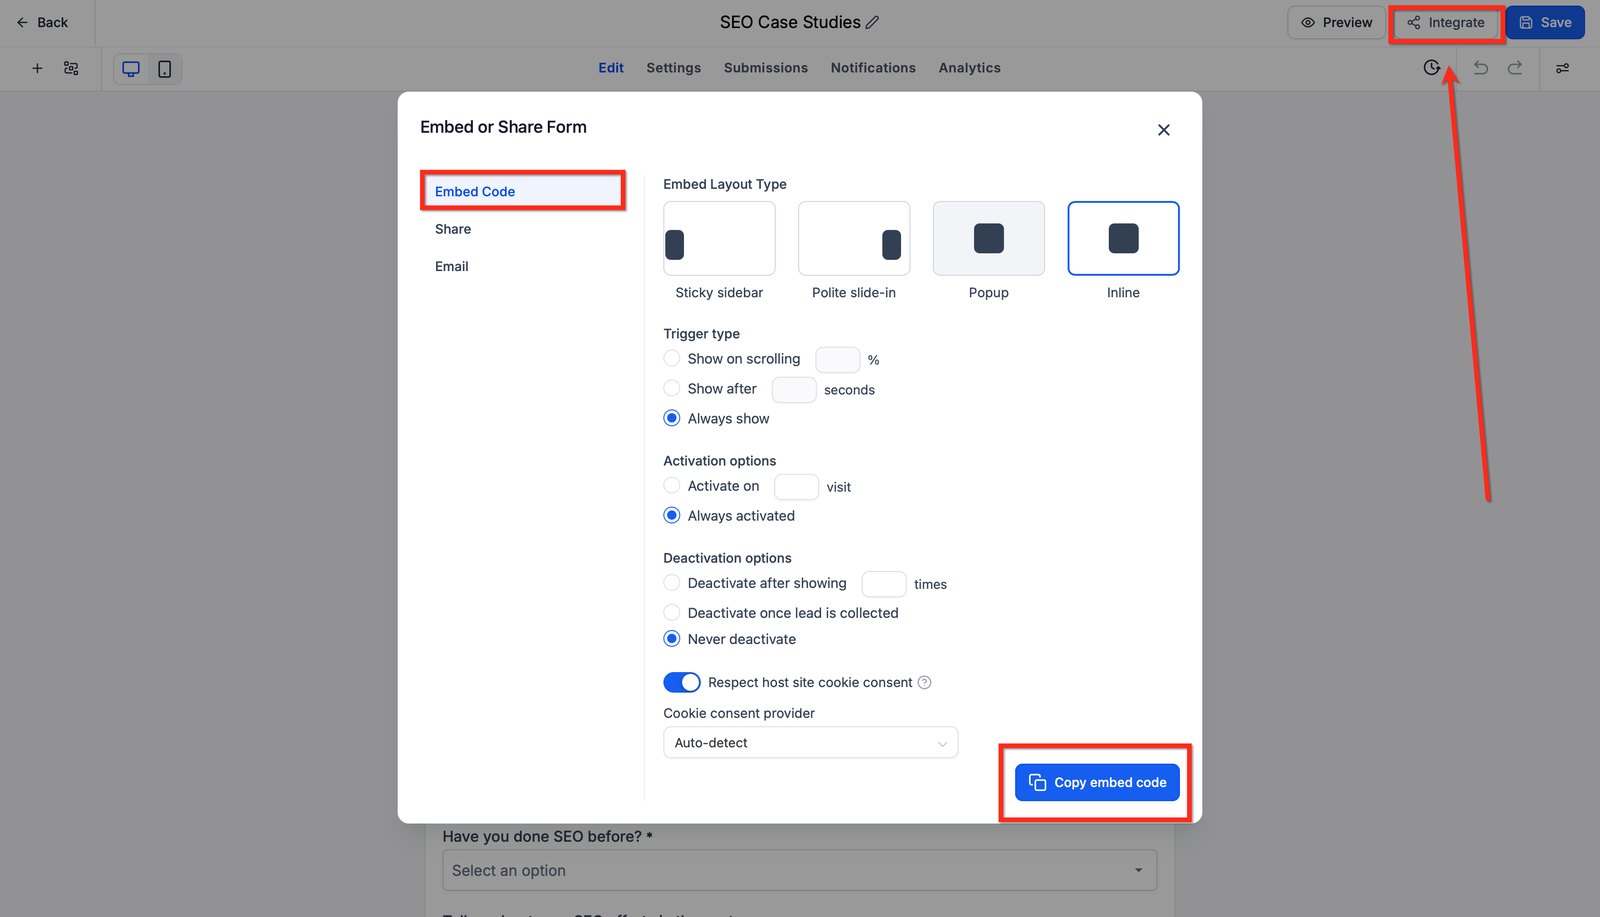
Hi baddie! I'm Hazel. A form writes to the contact record from the outside. Let's build one. Go to Sites, then the Forms tab, then Create form. Choose Start from Scratch or a template. For your practice form, start from scratch. Quick Add on the left has the fields. Drag in name, email and phone. Require only what the business needs to act. Every required field can cost a lead. Click a field to see where it saves: its Custom Field Name and Unique Key. Map each question to the field you planned. Don't let the form make a duplicate field. When it's ready, click Integrate to embed or share the form. Pick a layout, like inline or popup, then copy the embed code. List each question next to the field it writes to before you build. Read the lesson below, then try the practice.
Hi baddie! Si Hazel 'to. Ang form ang nagsusulat sa contact record mula sa labas. Gawa tayo ng isa. Go to Sites, then sa Forms tab, then Create form. Pumili ng Start from Scratch o template. Sa practice form mo, start from scratch. Nasa left ang Quick Add na may fields. I-drag ang name, email at phone. I-require lang ang kailangan ng business para kumilos. Bawat required field pwedeng mawalan ka ng lead. I-click ang field para makita kung saan siya nagse-save: ang Custom Field Name at Unique Key. I-map ang bawat tanong sa field na pinlano mo. Huwag hayaang gumawa ng duplicate field ang form. Pag ready na, i-click ang Integrate para i-embed o i-share ang form. Pumili ng layout, tulad ng inline o popup, then i-copy ang embed code. Bago mag-build, ilista ang bawat tanong katabi ng field na sinusulatan niya. Basahin ang lesson sa baba, tapos subukan ang practice.
What you'll learn
- Build a form with name, email and phone, all required
- Turn on sticky contact and remove the agency branding
- Understand how field mapping works when a client needs custom fields
- Test a form by submitting it for real
- Gumawa ng form na may name, email at phone, lahat required
- I-on ang sticky contact at tanggalin ang agency branding
- Maintindihan kung paano gumagana ang field mapping kapag may custom fields ang client
- I-test ang form sa pamamagitan ng totoong pag-submit
New words in this lesson
- Field mapping
- The connection between a form question and the contact field its answer is written to.
- Form
- A set of questions that creates or updates a contact when submitted, writing each answer to a mapped field.
What a client actually asks
"We just need a simple form: name, email and phone, and all three are a must. And please, no agency branding on it."
Ang tanong ng client
"Simpleng form lang ang kailangan namin: name, email at phone, at required lahat ng tatlo. At please, walang agency branding."
Key concepts
A form is a way to write to the contact record from the outside. Each question on the form is connected to a field on the contact. That connection is the field mapping, and it’s what turns “someone typed something” into “the contact record now knows their service area”.
When a form is submitted, GHL creates a new contact, or updates the existing one if the email or phone matches (remember Lesson 4). It then fills each mapped field with the answer.
Map to the fields you planned
This is where Module 2 pays off. The client wants area and urgency. You already designed those fields: Service area (dropdown) and Request type (radio). The form should use those fields, not new ones. (Your practice form below only needs standard fields, but most client forms need custom fields too, so learn this rule now.)
In GHL’s form builder, standard fields (name, email, phone) and your custom fields are available to drag onto the form. It’s also possible to create a brand-new field from inside the form builder. That’s the trap. A new form-made “Area” field means the data now lives in two places, and the routing you build in Module 5 only sees one of them.
Required fields cost leads
Every required field is a reason for someone to give up. Require the minimum the business needs to act: usually first name and one way to contact them. For this client, area and urgency are worth requiring too, because they decide who calls and how fast. Everything else can be optional.
What happens after submit
Every form needs a decision about the moment after someone submits. Common choices:
- Show a message — “Thanks! We’ll call you within one business day.”
- Redirect to a thank-you page or a booking calendar
Say what happens next and when. “Thanks for submitting” leaves a lead wondering.
Step-by-step build
Create a new form from blank (not a template) and name it with your format:
Maria-Practice form-024.Add the standard fields: first name (or full name), email and phone.
Make all three required. Click each field and turn on Required.
Check for agency branding. Open Preview. If an agency name or logo shows on the form, look for a branding switch in the form’s settings and turn it off. In the practice account there’s usually nothing to remove, so just confirm the preview is clean.
Turn on sticky contact. Open the form’s Settings tab and scroll down to Form Settings. Sticky contact remembers a visitor’s details, so the next form they open on the same browser fills itself in.
Leave the on-submit setting as a message for now. In the next lesson you’ll change it to redirect to your booking page.
- Save.
Check what you built
Open the form’s preview or share link and submit it yourself as your test
contact: first name Maria-Practice, last name contact-024,
with your own email and phone. Then open Contacts, search for your test contact
and confirm:
- the contact exists, with your name, email and phone
- the submission appears in the contact’s activity
- try submitting with the phone empty: the form should stop you
- open the preview again in the same browser: the fields fill themselves in. That’s sticky contact working.
If a field is empty on the contact, the mapping for that question is wrong.
Mga pangunahing konsepto
Ang form ay paraan para makasulat sa contact record mula sa labas. Bawat tanong sa form ay nakakonekta sa isang field sa contact. Ang koneksyon na ‘yan ang field mapping, at ‘yan ang nagpapabago ng “may nag-type ng kung ano” tungo sa “alam na ng contact record ang service area nila”.
Kapag na-submit ang form, gumagawa ang GHL ng bagong contact, o ina-update ang existing kung tugma ang email o phone (tandaan ang Lesson 4). Tapos pinupunan nito ang bawat naka-map na field ng sagot.
I-map sa mga field na pinlano mo
Dito nagbubunga ang Module 2. Gusto ng client ang area at urgency. Nadisenyo mo na ang mga field na ‘yan: Service area (dropdown) at Request type (radio). ‘Yan ang dapat gamitin ng form, hindi mga bago. (Standard fields lang ang kailangan ng practice form mo sa ibaba, pero karamihan ng client forms ay may custom fields din, kaya aralin mo na ang rule na ‘to ngayon.)
Sa form builder ng GHL, pwedeng i-drag papunta sa form ang standard fields (name, email, phone) at ang custom fields mo. Pwede ring gumawa ng bagong-bagong field mula mismo sa loob ng form builder. ‘Yan ang bitag. Ang bagong “Area” field na gawa sa form ay nangangahulugang nasa dalawang lugar na ang data, at isa lang doon ang nakikita ng routing na ibu-build mo sa Module 5.
Nagkakabawas ng leads ang required fields
Bawat required field ay dahilan para sumuko ang isang tao. I-require ang minimum na kailangan ng business para kumilos: kadalasan first name at isang paraan para makontak sila. Para sa client na ‘to, sulit ding i-require ang area at urgency, dahil sila ang nagdedesisyon kung sino ang tatawag at gaano kabilis. Pwedeng optional ang lahat ng iba.
Ano ang mangyayari pagka-submit
Kailangan ng bawat form ng desisyon tungkol sa sandali pagka-submit ng tao. Karaniwang pagpipilian:
- Magpakita ng message — “Salamat! Tatawagan ka namin sa loob ng isang business day.”
- Mag-redirect sa thank-you page o booking calendar
Sabihin kung ano ang susunod at kailan. Ang “Thanks for submitting” ay nag-iiwan sa lead na nagtataka.
Pag-build, step by step
Gumawa ng bagong form mula sa blank (hindi template) at pangalanan gamit ang format mo:
Maria-Practice form-024.Idagdag ang standard fields: first name (o full name), email at phone.
Gawing required ang tatlo. I-click ang bawat field at i-on ang Required.
I-check kung may agency branding. Buksan ang Preview. Kung may pangalan o logo ng agency sa form, hanapin ang branding switch sa settings ng form at i-off ito. Sa practice account kadalasan walang kailangang tanggalin, kaya i-confirm lang na malinis ang preview.
I-on ang sticky contact. Buksan ang Settings tab ng form at mag-scroll pababa sa Form Settings. Tinatandaan ng sticky contact ang details ng bisita, kaya kusang napupunan ang susunod na form na bubuksan nila sa parehong browser.
Iwan munang message ang on-submit setting. Sa susunod na lesson, papalitan mo ito para mag-redirect sa booking page mo.
- I-save.
I-check ang ginawa mo
Buksan ang preview o share link ng form at i-submit mo mismo bilang test
contact mo: first name Maria-Practice, last name
contact-024, gamit ang sarili mong email at phone. Tapos buksan ang
Contacts, hanapin ang test contact mo at kumpirmahin:
- may contact na, na may pangalan, email at phone mo
- lumalabas ang submission sa activity ng contact
- subukang mag-submit nang walang phone: dapat pigilan ka ng form
- buksan ulit ang preview sa parehong browser: kusang napupunan ang fields. ‘Yan ang sticky contact na gumagana.
Kung walang laman ang isang field sa contact, mali ang mapping ng tanong na ‘yon.
Common mistakes
- Gumagawa ng bagong field sa loob ng form builder sa halip na gamitin ang pinlano
- Gamitin ang existing na "Service area" field mula sa Module 2. Ang pangalawang "Area" field na gawa sa form ay maghahati sa data at sisira sa bawat filter na naka-build sa una.
- Ginagawang required ang lahat ng field
- Bawat required field, may nawawalang ilang leads. I-require lang ang talagang hindi kayang wala ng business — kadalasan pangalan at isang paraan para makontak sila.
- Nagte-test sa pamamagitan ng mano-manong paggawa ng contact
- Nilalaktawan niyan ang form nang buo. I-submit ang mismong form, tapos i-check ang contact record na ginawa nito.
- Iniiwan ang default na "thank you" nang walang next step
- Magdesisyon kung ano ang dapat makita o gawin ng lead pagkatapos — malinaw na message, redirect, o booking link. Ang sandali pagka-submit ang oras na pinaka-engaged ang lead.
- Creating a new field inside the form builder instead of using the planned one
- Use the existing "Service area" field from Module 2. A second, form-made "Area" field splits the data and breaks every filter built on the first.
- Making every field required
- Each required field loses you some leads. Require what the business truly can't act without — usually a name and one way to contact them.
- Testing by creating a contact by hand
- That skips the form completely. Submit the actual form, then check the contact record it created.
- Leaving the default "thank you" with no next step
- Decide what the lead should see or do next — a clear message, a redirect, or a booking link. The moment after submitting is when a lead is most engaged.
Practice
🔒 Practice opens once you've completed every lesson in Learn.
Want to follow along in a real account? You need GHL access — get a free 30-day trial + free live training (affiliate link). Gusto mo bang sumabay sa totoong account? Kailangan mo ng GHL access — kumuha ng libreng 30-day trial + libreng live training (affiliate link).
Knowledge check
5 quick questions. You'll see why each answer is right or wrong as you go, and you can retake it as often as you like.