Get Certified · Workflow practice
Upgrade your lead-to-booking system
The four workflows you built in Modules 5 and 6, upgraded the way Hazel builds them in her own GoHighLevel account. Together they move every lead through your pipeline automatically, from first form to booked call.
Finish the practice questions first
Workflow practice unlocks once you score 85 or more out of 100 on the practice questions. Your progress is saved under your email on this device.
Go to the practice questionsThe big picture
Each workflow moves the lead one stage further along your pipeline, YourName-Practice pipeline-StudentID, with the four stages from Lesson 11:
- New LeadYourName-Practice Nurture-StudentID
- Hot LeadYourName-Practice Hot Lead-StudentID
- Booked CallYourName-Practice Booked Call-StudentID
- No-show NurtureYourName-Practice No Show-StudentID
The pattern to learn: every workflow uses Find opportunity → Update if found, Create if not → Go to. It's one of the most useful patterns in GoHighLevel, because it never creates a duplicate deal.
Before you start: finish the practice builds in the lessons first. You need your form and funnel (Lessons 8 and 9), your pipeline with the stages New Lead, Hot Lead, Booked Call and No-show Nurture (Lesson 11), your calendar, whose Calendar Name custom value is "First Consultation" (Lesson 18), and the four workflows from Lessons 13 to 19. This page upgrades those same workflows. Don't build new copies: two workflows on the same form or calendar would send every email twice.
Workflow 1 of 4
YourName-Practice Nurture-StudentID
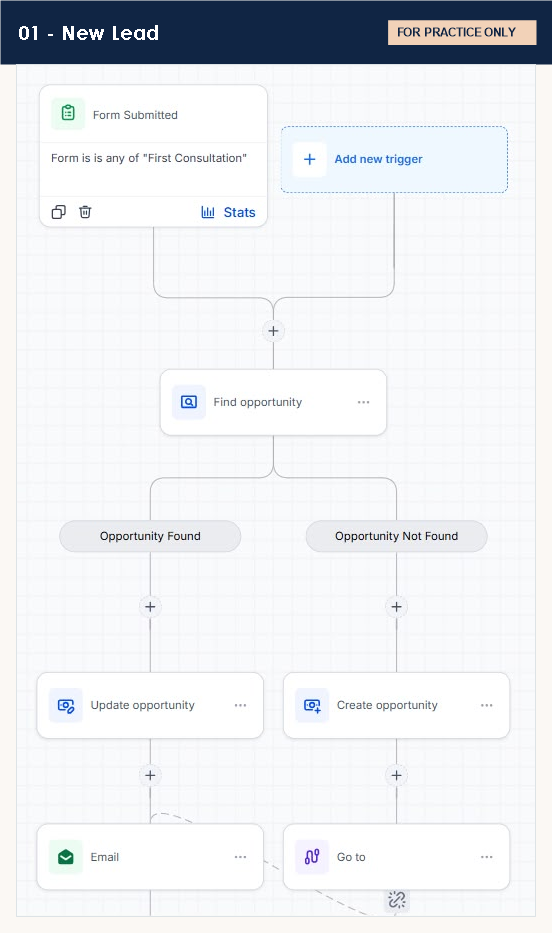
When someone fills in your form, put them in New Lead without ever making a duplicate deal, then start the welcome emails.
Trigger
Form submitted, filtered so the form is YOUR form: YourName-Practice form-StudentID.
Why it's built this way
- Find opportunity first. Before creating a deal, the workflow checks whether this person already has one. This "find, then update or create" pattern stops duplicate deals when someone fills in the form twice (your Nurture has re-entry on, so this really happens).
- Two branches. Opportunity Found updates the existing deal. Opportunity Not Found creates a new one.
- Go to joins the branches back together. In the screenshot, the dashed line shows the "Not Found" side jumping across to the next step, so you only build the rest of the workflow once.
How to build it
- Open Automation → Workflows → your folder (YourName-Practice workflow-StudentID) and open YourName-Practice Nurture-StudentID from Lessons 13 to 16. Don't create a second copy: two workflows on the same form send every email twice.
- Check the trigger: Form submitted, filtered to your own form, with re-entry on.
- Find your Create / update opportunity step and replace it with Find opportunity. Pick YOUR pipeline (YourName-Practice pipeline-StudentID). GHL adds the Opportunity Found and Opportunity Not Found branches for you.
- Under Opportunity Found, add Update opportunity and set the stage to New Lead.
- Under Opportunity Not Found, add Create opportunity in your pipeline, stage New Lead. Use the contact's name as the opportunity name.
- Under Update opportunity, keep the rest of your Nurture in order: Add tag (yourname-practice-StudentID), the first email with your Booking URL custom value, then the waits and emails 2 and 3.
- Under Create opportunity, add Go to and point it at the Add tag step, so both branches run the same steps.
- Check the settings still have stop on response on. Save and publish, then submit your funnel's Home page as your test contact.
Check your build
Learn the pieces: Workflow Triggers · Workflow Actions · Wait Steps
Workflow 2 of 4
YourName-Practice Hot Lead-StudentID
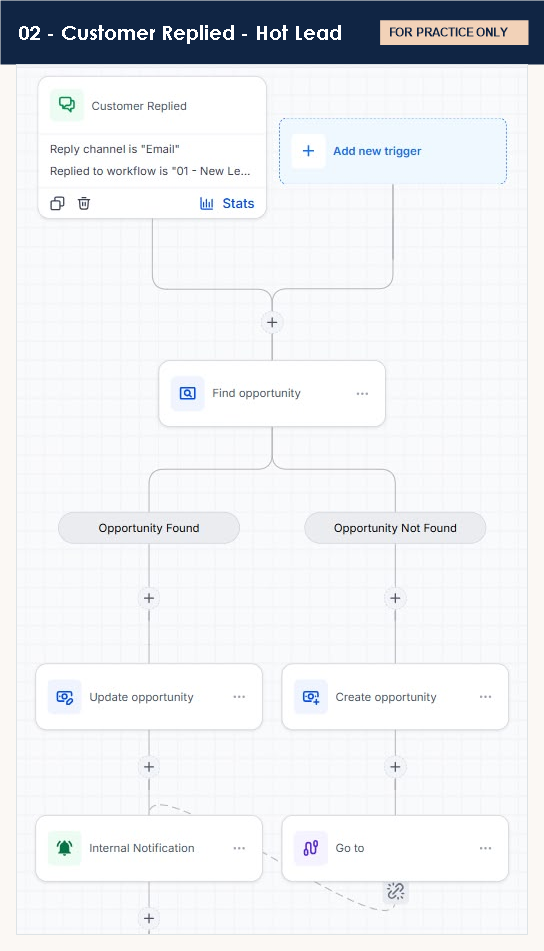
When one of YOUR leads replies to your nurture email, move the deal to Hot Lead and tell yourself straight away.
Trigger
Customer replied, then an If/Else branch "My lead": contact tag includes yourname-practice-StudentID.
Why it's built this way
- A reply is a buying signal. Someone who answers your nurture email is warmer than someone who doesn't, so the deal moves to Hot Lead.
- The tag check keeps it to your leads. Every student's leads reply in the same account. Your Nurture tags your leads, so the "My lead" branch only acts on yours. If your trigger offers a "Replied to workflow" filter, you can also set it to your Nurture workflow.
- Internal notification, not an email to the lead. The point is to tell the person who follows up. Go to joins the Not Found branch to the same notification.
How to build it
- Open YourName-Practice Hot Lead-StudentID from Lesson 15 in your folder. Don't create a second copy.
- Check the trigger is Customer replied, followed by the If/Else branch "My lead" with the condition: contact tag includes yourname-practice-StudentID. The default path stays "Not my lead: do nothing".
- In the "My lead" branch, replace your Create / update opportunity step with Find opportunity in YOUR pipeline.
- Opportunity Found → Update opportunity, moving the stage to Hot Lead.
- Opportunity Not Found → Create opportunity directly in Hot Lead.
- Under Update opportunity, keep your internal notification to yourself, with the contact's name and the reply's message body.
- Under Create opportunity, add Go to and point it at the internal notification.
- Save and publish. Test by replying to the first email from your Nurture.
Check your build
Learn the pieces: Filters and If/Else Branches · Testing a Workflow · Designing a Pipeline
Workflow 3 of 4
YourName-Practice Booked Call-StudentID
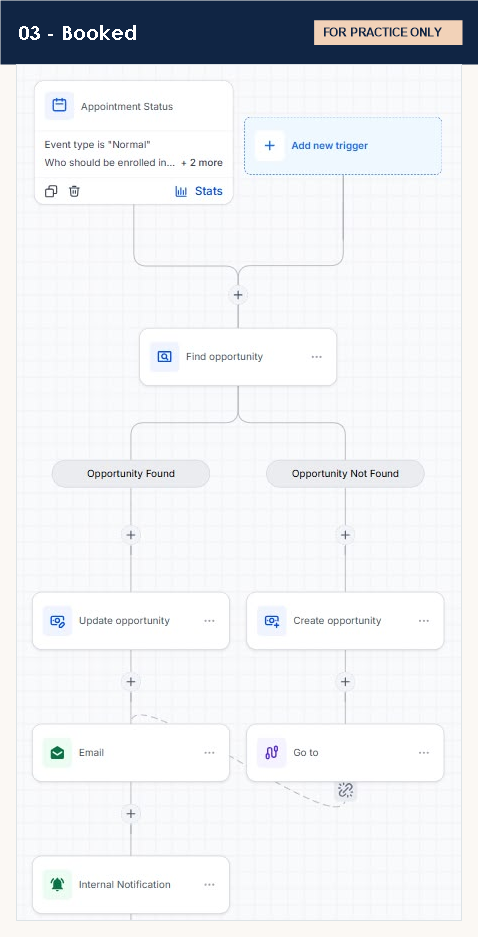
When a lead books on YOUR calendar, move the deal to Booked Call, confirm the booking, tell yourself, and stop the nurture.
Trigger
Appointment booked (or Appointment status: booked/confirmed), filtered so the calendar is YOUR calendar: YourName-Practice calendar-StudentID.
Why it's built this way
- The pipeline should always match reality. Booking a call is the biggest step a lead takes, so the deal moves automatically. Nobody has to remember to drag it.
- Two messages, two audiences. The email confirms the booking for the lead. The internal notification email tells the person they're meeting.
- Same find → update/create → Go to pattern as your Nurture and Hot Lead. Once you've built it once, you can build it anywhere.
How to build it
- Open YourName-Practice Booked Call-StudentID from Lesson 19 in your folder. Don't create a second copy.
- Check the trigger is filtered to your own calendar. Without that filter it fires for every student's bookings.
- Replace your Create / update opportunity step with Find opportunity in YOUR pipeline.
- Opportunity Found → Update opportunity, moving the stage to Booked Call.
- Opportunity Not Found → Create opportunity in Booked Call.
- Under Update opportunity, keep the rest in this order: the confirmation email (with your Calendar Name custom value, start time, meeting link, cancel and reschedule links), the internal notification (email) to the assigned user, then Remove from workflow: YourName-Practice Nurture-StudentID.
- Under Create opportunity, add Go to and point it at the confirmation email.
- Save and publish. Then book a test slot on your funnel's Booking page, at least 2 days ahead.
Check your build
Learn the pieces: Calendar Types · Build a 24-Hour Appointment Reminder · Testing a Workflow
Workflow 4 of 4
YourName-Practice No Show-StudentID
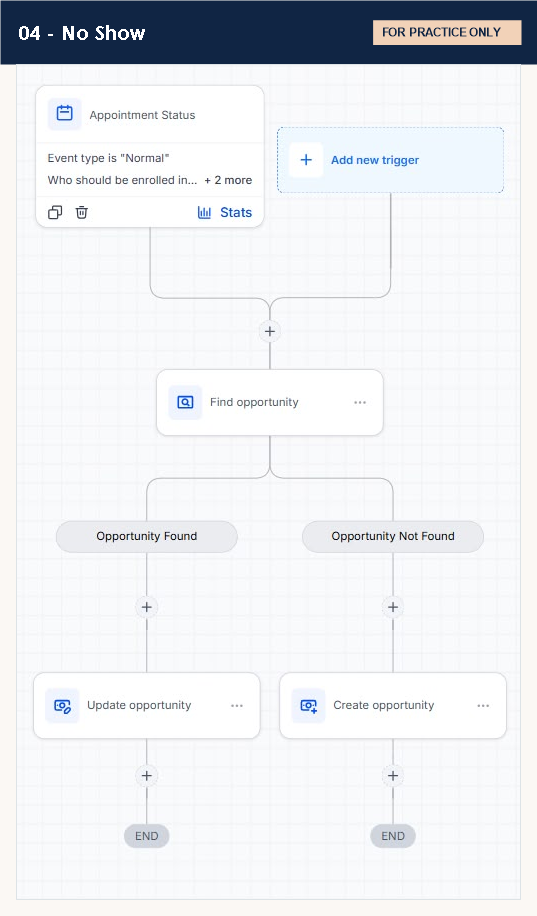
When someone misses their appointment on YOUR calendar, move the deal to No-show Nurture so it gets followed up.
Trigger
Appointment status, with two filters: status is no-show, and the calendar is YOUR calendar.
Why it's built this way
- The smallest workflow, on purpose. It only keeps the pipeline honest: find the deal, move it to No-show Nurture, end.
- Why it still matters. A No-show Nurture column shows the business exactly who needs a rebooking call, instead of those deals quietly sitting in Booked Call.
- Notice both branches END. There's nothing to merge, so no Go to step is needed.
How to build it
- Open YourName-Practice No Show-StudentID from Lesson 19 in your folder. Don't create a second copy.
- Check the trigger: Appointment status, filtered to no-show AND your own calendar, with re-entry on.
- Replace your Create / update opportunity step with Find opportunity in YOUR pipeline.
- Opportunity Found → Update opportunity, moving the stage to No-show Nurture.
- Opportunity Not Found → Create opportunity in No-show Nurture.
- Save and publish. Test by opening your test appointment in your calendar and marking it as a no-show.
- Challenge (optional): add a friendly "Sorry we missed you, want to rebook?" email after Update opportunity, with a Go to from the Create side. Only send it to your own test contact.
Check your build
Learn the pieces: Filters and If/Else Branches · Client scenario: The No-Show Problem
Finished all four?
You've built a complete lead-to-booking system, the kind of thing clients pay for. Run one test contact (your own email and phone) through all four: submit your funnel's Home page, reply to the first email, book on your Booking page, then mark the appointment as a no-show. Check the same deal moves New Lead → Hot Lead → Booked Call → No-show Nurture, and that only one deal exists the whole time.
It's also good preparation for HighLevel's certification, which includes hands-on tasks inside GoHighLevel.

Free feedback from Hazel
Get your build checked
Finished (or stuck)? Record a quick video of your work and post it in GHL Baddie HQ. Hazel watches it and leaves you a comment on what's working and what to fix.
- Record a 3–5 minute walkthrough with Loom. Loom is free. Show what you built, run one test while recording, and say anything you're unsure about.
- Copy your Loom share link.
- Post it in the GHL Baddie HQ Discord with three things: that it's the Workflow practice (4 workflows), which part you'd like checked, and one question you have.
- Hazel reviews it and comments. Others in the community may chip in too — that's half the fun.
⚠ Use a practice account only. Never record real client data, passwords or API keys.
Preparing for your certification?
I'll help you get ready — for free
Studying for the HighLevel certification on your own can feel like a lot. I've been through it, and I'm happy to help you prepare. No cost, no catch.
- Answers to your questions while you study
- Feedback on your practice builds
- A simple study plan that fits your schedule
How to get coaching
- Join GHL Baddie HQ, our free Discord community.
- Post that you're preparing for your certification and what you'd like help with.
- I'll reply there.
Haven't enrolled yet? When you're ready, you can sign up on HighLevel's certification page. (That's my affiliate link. It costs you nothing extra, and my coaching is free either way.)
Coaching covers the skills, never exam questions or answers. No one can guarantee a pass. Your GHL Baddie isn't affiliated with HighLevel, and HighLevel sets its own prices and terms.