Module 7 · Lesson 3 of 4
Sending Your First Email Campaign Ang Una Mong Email Campaign
Awaiting hands-on verification. The concepts here are sound, but the click-by-click steps have not yet been re-walked in a live GoHighLevel sub-account. GoHighLevel changes often, so a menu name or screen may differ from what you see. Flagged rather than presented as verified.
Before this: Smart Lists: Finding the Right Contacts
Your knowledge-check score on Your Conversations Inbox was under 60%. Worth a quick re-read before this one — it builds on it.
On this page

In this lesson
Sending Your First Email Campaign
Sa lesson na ’to
Ang Una Mong Email Campaign

Read the transcript
Hey baddie! I'm Hazel. It's time to send your first email campaign. Go to Marketing, then Emails, then Campaigns, and create a new one. This is the email builder. Drag text, images and buttons from the left. Then design your email in the middle. Before anything else, test it! Click Preview to check how it looks on mobile. Then click the three dots, then Test Email. Send it to yourself and read it on your phone. Happy with it? Click Send or Schedule. Add a subject line that makes people want to open it. Under Recipient, choose Send to Smart List and pick your list. Remember the Smart Lists from Level 2? This is where you use them. Now choose Send Now or Schedule. Scheduling is great if you want the email out at 9 AM, even while you're still asleep. Fill in your sender name and email, click Review and Send, and boom, it's launched! Do your practice task and send one to yourself. Next lesson: texting rules. That one's very important, promise!
Hey baddie! Si Hazel 'to. Time na para mag-send ng first email campaign mo. Go to Marketing, then Emails, then Campaigns, and create a new one. This is the email builder. Drag text, images and buttons dito sa left, and design your email in the middle. Before anything else, test muna! Click Preview to check mobile, then the three dots, then Test Email. Send it to yourself and read it on your phone. Happy with it? Click Send or Schedule. Add a subject line that makes people want to open it. Then under Recipient, choose Send to Smart List and pick your list. Remember the Smart Lists from Level 2? Dito sila magagamit. Now choose Send Now or Schedule. Scheduling is great if gusto mong lumabas ang email ng 9 AM kahit tulog ka pa. Fill in your sender name and email, click Review and Send, and boom, launched! Do your practice task and send one to yourself. See you sa next lesson, where we'll talk about texting rules. Very important yun, promise!
What you'll learn
- Create a new email campaign in GHL
- Send a test email to yourself before the real one
- Choose a Smart List as your recipients
- Send the campaign now or schedule it for later
- Gumawa ng bagong email campaign sa GHL
- Mag-send ng test email sa sarili mo bago ang totoong send
- Pumili ng Smart List bilang recipients
- I-send ang campaign ngayon o i-schedule para mamaya
What a client actually asks
"We're running a holiday promo. Can you send it to all 300 of our clients? I really don't want to text them one by one."
Ang tanong ng client
"May holiday promo kami. Pwede mo bang ipadala sa lahat ng 300 clients namin? Ayoko talagang i-text sila isa-isa."
Why this matters
Say you run a med spa and you’re having a holiday promo. You’re not going to text all 300 clients one by one, right? With one email campaign, everyone on your list gets the promo at the same time, with their own name on it.
Words to know
- Email campaign: one email sent to many contacts at once, like a newsletter or promo.
- Email builder: GHL’s drag-and-drop editor where you design the email.
- Smart List: a saved filter of contacts (you made these in Level 2!), like “all clients tagged VIP”.
- Recipients: the people who will receive the email.
- Sending domain: the website address your emails are sent from. GHL needs this set up and verified before you can send.
Step-by-step walkthrough
This happens inside a sub-account.
Part A: Create the email
- In the left menu, click Marketing, then Emails, then Campaigns. (Some accounts show it as “Email”.)
- Create a new campaign. You can start from a template so you’re not starting from a blank page.
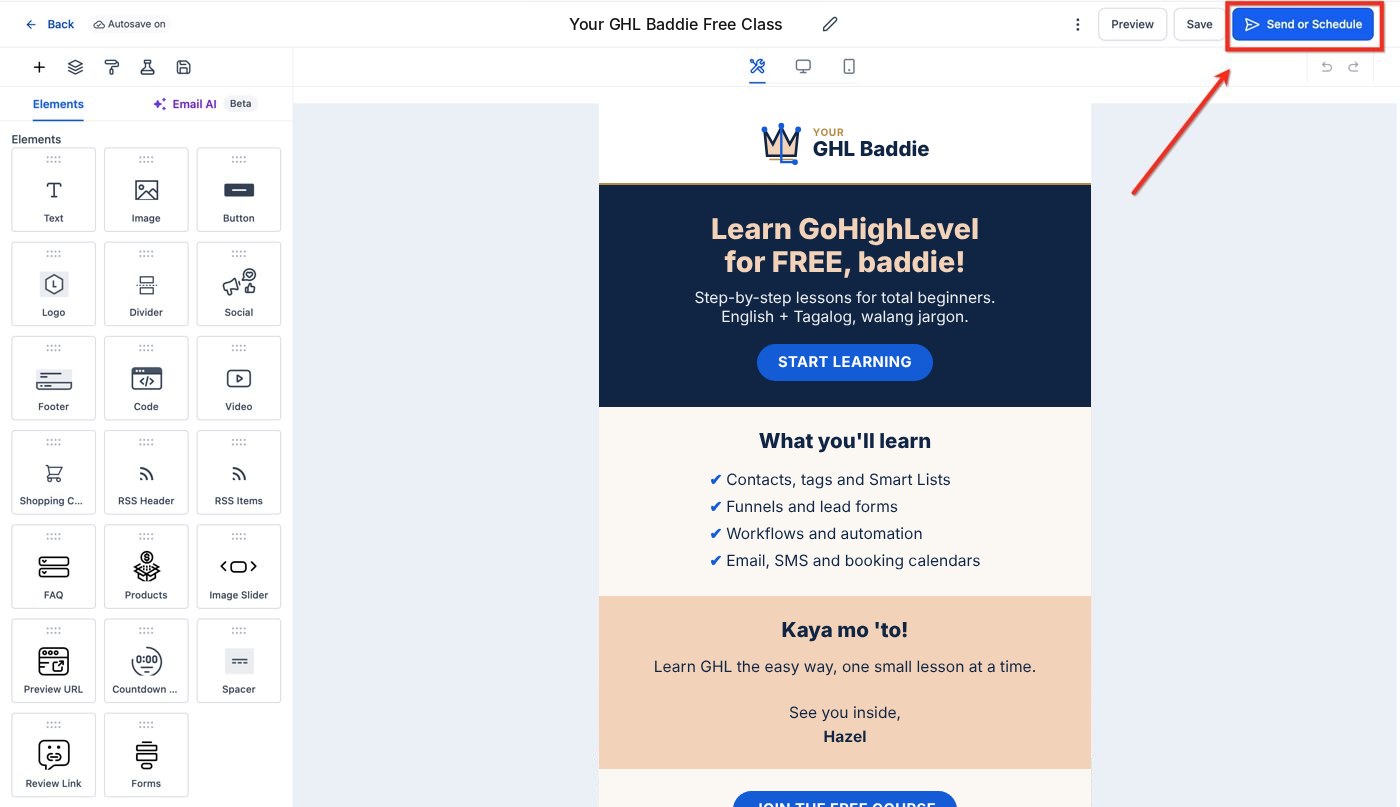
- In the email builder, drag elements like Text, Image and Button from the left panel into your email.
- Click the title at the top to rename your campaign, like “Holiday Promo 2026”.
Part B: Test it first
- Click Preview at the top to see how it looks on desktop, tablet and mobile.
- Click the three dots beside Preview, then Test Email.
- Put your own email as the receiver and click Send Test Email. Open it on your phone and check everything. (Note: the unsubscribe link won’t work in test emails. That’s normal.)
Part C: Choose who gets it
- Click Send or Schedule at the top right.
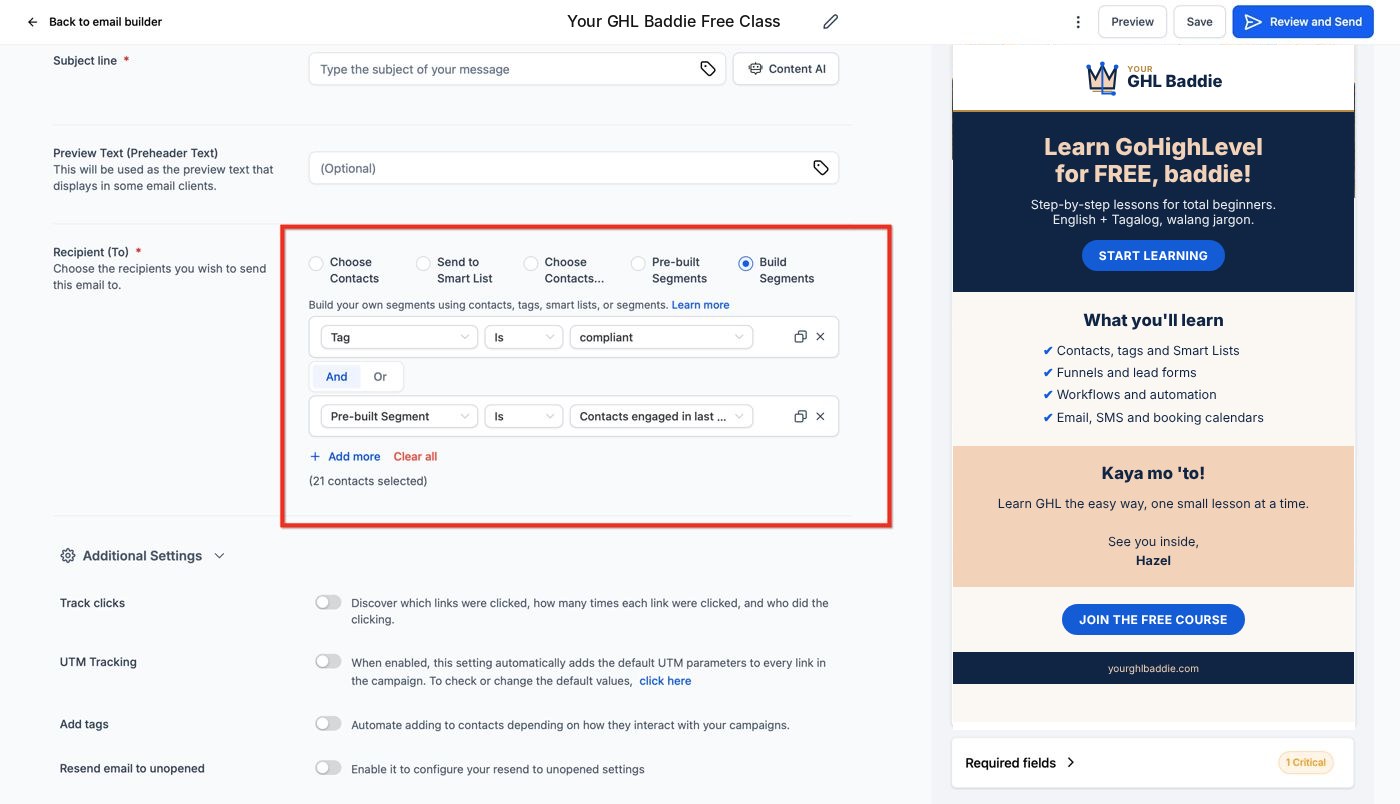
- Fill in the Subject line (the title people see in their inbox) and the optional Preview Text.
- Under Recipient (To), choose Send to Smart List, then pick your list. The other options are Choose Contacts, Pre-built Segments and Build Segments, but for your first campaign, Smart List is the easiest.
Part D: Send or schedule
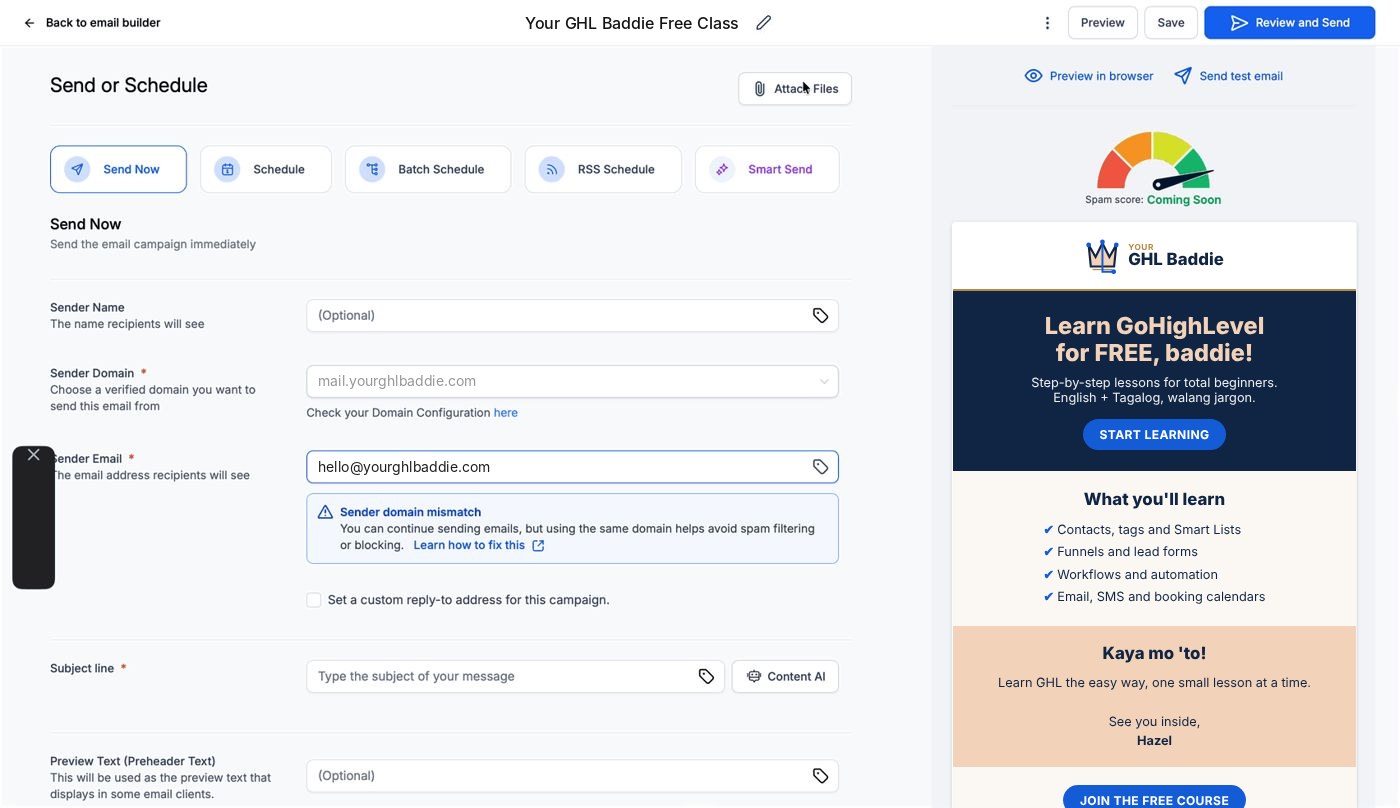
- Pick Send Now to send right away, or Schedule to choose a date and time (based on your sub-account’s timezone).
- Fill in the Sender Name (like “Glow Med Spa”), the Sender Domain and the Sender Email.
- Click Review and Send, check everything one last time, then send. Congrats, campaign launched!
Practice task
- Make a Smart List with just yourself in it. Use a tag only you use, like
maria-practice-024, so no other student’s contacts end up on your list. - Create an email campaign from a template and change the text to a promo for a pretend business.
- Send yourself a test email.
- Send the real campaign to your test Smart List, or schedule it for tomorrow morning.
I did it! checklist
Bakit ito mahalaga
Say you run a med spa and you’re having a holiday promo. Hindi mo naman ite-text isa-isa ang 300 clients mo, diba? With one email campaign, everyone on your list gets the promo at the same time, with their own name on it.
Mga salitang dapat alam mo
- Email campaign: isang email na sabay-sabay ipinapadala sa maraming contacts, like newsletter o promo.
- Email builder: ang drag-and-drop editor ng GHL kung saan mo dinidisenyo ang email.
- Smart List: saved filter ng contacts (ginawa mo na ito sa Level 2!), like “all clients tagged VIP”.
- Recipients: ang mga taong makakatanggap ng email.
- Sending domain: ang website address kung saan galing ang emails mo. Kailangan itong naka-set up at verified sa GHL bago ka makapag-send.
Gabay, step by step
Ginagawa ito inside a sub-account.
Part A: Gawin ang email
- Sa left menu, click Marketing, tapos Emails, tapos Campaigns. (Sa ibang accounts, “Email” ang nakalagay.)
- Gumawa ng bagong campaign. Pwede kang magsimula sa template para hindi ka magsimula sa blangko.
- Sa email builder, i-drag ang elements like Text, Image at Button mula sa left panel papunta sa email mo.
- I-click ang title sa taas para palitan ang pangalan ng campaign mo, like “Holiday Promo 2026”.
Part B: I-test muna
- I-click ang Preview sa taas para makita ang itsura nito sa desktop, tablet at mobile.
- I-click ang three dots sa tabi ng Preview, tapos Test Email.
- Ilagay ang sarili mong email bilang receiver at i-click ang Send Test Email. Buksan ito sa phone mo at i-check lahat. (Note: hindi gagana ang unsubscribe link sa test emails. Normal lang yan.)
Part C: Piliin kung sino ang makakatanggap
- I-click ang Send or Schedule sa top right.
- Punan ang Subject line (ang title na nakikita ng mga tao sa inbox nila) at ang optional na Preview Text.
- Sa Recipient (To), piliin ang Send to Smart List, tapos piliin ang list mo. Ang ibang options ay Choose Contacts, Pre-built Segments at Build Segments, pero for your first campaign, Smart List ang pinakamadali.
Part D: I-send o i-schedule
- Piliin ang Send Now para i-send agad, o Schedule para pumili ng date at time (base sa timezone ng sub-account mo).
- Punan ang Sender Name (like “Glow Med Spa”), ang Sender Domain at ang Sender Email.
- I-click ang Review and Send, i-check lahat one last time, tapos i-send. Congrats, launched na ang campaign mo!
Practice task mo
- Gumawa ng Smart List na ikaw lang ang laman. Gumamit ng tag na ikaw lang ang gumagamit, like
maria-practice-024, para walang contacts ng ibang student na mapasama sa list mo. - Gumawa ng email campaign mula sa template at palitan ang text ng promo para sa isang pretend business.
- Padalhan ang sarili mo ng test email.
- I-send ang totoong campaign sa test Smart List mo, o i-schedule ito para bukas ng umaga.
Checklist: Nagawa ko!
Common mistakes
- Nagse-send sa buong list nang walang test email
- Isang typo lang sa subject line, makikita ng buong list mo. Mag-send muna ng test sa sarili mo at basahin ito sa phone mo.
- Hindi pinapansin ang "sender domain mismatch" warning
- Ayusin mo muna bago mag-send. Kapag pareho ang domain ng sender email mo, mas malamang na hindi mapunta sa spam ang emails mo.
- Nakakalimutan kung kaninong timezone ang sinusunod ng scheduled send
- Timezone ng sub-account ang sinusunod ng Schedule, hindi ang sa'yo. I-check muna bago ka pumili ng 9 AM.
- Sending to the whole list without a test email
- One typo in the subject line and your whole list sees it. Send a test to yourself first and read it on your phone.
- Ignoring a "sender domain mismatch" warning
- Fix it before you send. Using the same domain for your sender email helps your emails stay out of spam.
- Forgetting whose timezone a scheduled send uses
- Schedule follows the sub-account's timezone, not yours. Check it before you pick 9 AM.
Want to follow along in a real account? You need GHL access — get a free 30-day trial + free live training (affiliate link). Gusto mo bang sumabay sa totoong account? Kailangan mo ng GHL access — kumuha ng libreng 30-day trial + libreng live training (affiliate link).
Knowledge check
5 quick questions. You'll see why each answer is right or wrong as you go, and you can retake it as often as you like.